Thursday, 5 July 2018

Raleigh Grand Prix - Broken Fork.

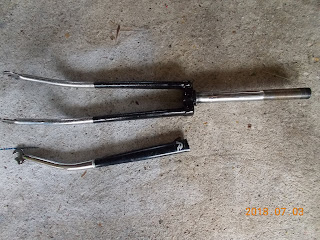
On the 19th of June I got home from a ride and discovered that the fork on my Raleigh Grand Prix  (1974) had broken. It was only held in place by the wheel and mudguard.


It is a large 25 1/2  inch frame so the steering post is quite long. (25.8.cm).
I posted about it on the Facebook page for vintage Raleigh bikes and had an offer of a large fork from 'Clint' who is in Wisconsin.  Clint was going to investigate prices for shipping it. Michael says he has a spare from his Raleigh Record, but I think that it will be a bit smaller. No luck on e-bay.

It was also suggested that I could get Bob Jackson cycles to build me a new fork, but from his website I see that the cost is £150. Ouch.

Then a friend suggested that I look up Tony Greening, and ex-cycle racer and now frame builder. He only lives about half-a-mile away. He straightened the frame on the previous incarnation of this bicycle many years ago.  My LBS had suggested that he could weld it up, but might advise against it.  I didn't bother asking about that option.

Luckily I have a spare fork in my garage and the blades are the same length as the broken one, though the steering tube is shorter by about a centimetre. Tony suggested that he could remove the steering tube from in the crown with his lathe and buy a length of steel pipe from Ceeway a purveyor of bicycle tubing and parts for bike builders, which he would then create a new steering tube to fit.


After I got home I thought that I could saw the steering tube out of the crown of the broken forks, so that is what I did. After all, it is already the right length and threaded.

I have now given this to Tony and he will use the lathe to get rid of the excess metal and then fit it to the forks.

22 July 2018 Tony Phoned on Friday and had it ready for me.  Here is what the rebuilt fork looks like:


Notice the shape of the crown is not a 'Raleigh' shape. I have now resprayed the black part of the forks and rebuilt the bike, and everything is super.

I am on the road again, though I do need some new bar tape on the handlebars.

Finish.


Monday, 30 April 2018

RC-Car using Flask

WebIOPi is dead. It doesn't work with the latest raspbian.

[2018-10-15]
I have been trying other IOT programs without success.
In Linux Format October 2017 LXF229 there was an article about using Flask with an example.
sudo apt-get install python3-flask.
mkdir rc-far
cd rc-car
mkdir templates
save app.py in the rc-car directory
save index.html in the templates directory

[Need to install filezilla and transfer files to the Pi. Need to debug.] - leave for now. Copied and pasted contents of files using nano.

to test: browse from another device to 192.168.1.8:5000

[2018-10-16] created script with two lines as below and it worked.
Problems. Cannot stop forward/backward.
2. formatting of HTML.

[2020-8-26] Latest version of Raspian -Buster does not contain gpiozero

sudo apt install python3-gpiozero  needs to be done.


[2018-4-30]
It didn't work because the author Les Pounder forgot to add one or two steps. He was very quick to reply to me and we got it sorted.  The lines that I needed were:
export FLASK_APP=/home/pi/rc-car/app.py
flask run –host=192.168.1.8

I have now put these into a shell script file that I run to start things happening.

My file structure is
/home/pi/rc-car/template/jquery

It made use of GpioZero libraries that are different to those I was using before.  The main problem was that his example only seemed to use one motor, and I have two motors.  I did get it working to drive the main wheels.

A search found an example using flask that did have two motors, but this is one on each wheel, whereas my configuration is one to drive forwards and backwards, and one to turn the front wheels.
This is from a github example by Kevin Olson https://github.com/olsonk/web-robot
I put this on the Pi and it failed. I have sorted out one of the problems. In the app.py program the debugging print statements are in the wrong format. They have now changed to a function call and need the parameters in ().  Sorted, But it still fails.
I have found an email for kevin Olson and asked him. We shall see.
The Html file calls a javascript that is in a certain place. I don't have it. I tried to download  jquery and apt-get said I had the latest version.  I have now found a version on-line at https://code.jquery.com/jquery-3.3.1.js
 and created a folder 'jquery' and put this file in there, edited the html, and am ready to test.

Aside: For what it's worth, I have replaced the motor drivers by the Deek-Robot  board using the L293D chip. http://www.deek-robot.com/productshow.asp?id=17&small=4


I had changed the text in the index .html file from {{ Title}} to {{ RC-6 Olson model }} . It didn't like that. I think Title within {{...}} is passed over from the app.py?

Also it failed because it didn't like the file name index.html. I changed it to main.html and it worked. The browser sees it. Unfortunately the LEDs do not work. I always have this problem with identifying them, and I wonder if GPioZero Libraries use different numbering than I am used to.

Tomorrow?
2018-05-02 Not touched code. I bolted the Raspberry Pi zero down to the car chassis. It required making two flanges from an old plastic box and drilling the holes in it to attach it via the Meccano bolts and some very fine bolts that I found in my junk box. The RC car was a Meccano toy originally. I also cut down a piece of dowel to act as a mast for the Wireless dongle as the R-Pi zero has a 4 inch converter cable from micro-USB to USB.

GPIO Pins                   Wire Colour             Deek-Robot
6                                    Black                         GND
12                                  Orange                       In1
16                                  green                          In2
17                                  Red                            In4
21                                  Yellow                       In3

This seems to work all backwards using the WebIOPi program Left = right, FWD = Backwd.


2018-05-08
Catching up. I got it working  using Les Pounders programs. New problem is that forward backward only stay on for a short period.  I got rid of the Internet stuff by using the jscript stuff that i installed following the Olson instructions.

Here are the motor controls.   the sleep lines are commented out.
led = LED(25)
motor = Motor(forward=18, backward=23)
turn  = Motor(forward=10, backward=11) 


In LP's stuff the html is tidier, but doesn't put nice boxes. This is all in one line across the page with wrapping.

   Click on the buttons to trigger the action


    Motor Forward    
    Toggle LED       
    Motor Backward
    Motor Left   
    Motor Right


Here is the Olson code: 


which does have separate lines for the Left/right 'buttons' 

Need to think about how I do it for the first one. 
Note. This writeup doesn't show the code, it shows the result. How do I fix that? 

--> No. LP stuff does have boxes, Forward/LED/Backward on the first line, and Left/right on the next line. It does use an external bit of code.  Problem is, I can only turn off forward by pressing Backward. LED Toggle works, and because I have forward/backward selected, I can't do Left/Right. 
Hmm.

2019-04-26

Update, I now have another car, labelled '2' It has the Raspberry Pi with SD card #3 in it which is the Flask code, but still requires an access point. Card #4 and #7 have the access point in the R-Pi so are not tethered to an Access point.

Anyway, yesterday I tried this car and noticed the ground wire between the R-Pi and the driver board started smoking and melting. Today it doesn't work, now that the wire has been rerouted. The batteries are good on both parts.  The R-Pi has been tested on my test rig and is OK.  The main difference since I 'built' this car some months ago are that the the wires now go from the R-Pi to the board through two 16 pin Dil Headers, one with the wires soldered into it and one on the board where the IC was.

OK, I tested without the driver board powered and just cheking the outputs of the R-Pi on to the board, and they were all coming out as -4.56V. Whoo!. What I discovered is that the ground wire to teh R-Pi was on pin4 (+5V), not pin 6 as it should be.  Fired it all up again and it sort of works, except everything is backwards. Forward on the web page makes it go backward, and Left turns Right!. Easy to fix.

Lets make the following changes:
GPIO pin 12 = brown  --> Red
GPIO pin 16 = red   -->Brown

GPIO Pin 23 = White --> Black
GPIO Pin 19 = Black --> White

One pin on the IC on the driver board does not make a connection so needs resoldering.


Friday, 30 March 2018

RC-CAr with Cayenne IOT Program.

2018-03-30
Starting from Raspian Jessie with fixed IP address.

In my folders this is Robot-6-Cayenne

https://mydevices.com/cayenne/landing/create-raspberry-pi-projects-with-cayenne/

First problem: It needs an app on a tablet. Have that.

It didn't work at first. I went in and deleted the /etc/webiopi/config file from the initial webIOPi configuration and then it connected.

Cayenne is NOT going to work  with my setup as is because 3 GPIO  pins are labelled as SPI pins and cannot be changed to I/O pins so I cannot control my left/right turning.   These are GPIO 9,10 and 11.

I am still not certain that I could have had it working without Internet access.

I need to find out how to delete Cayenne so that I can use the R-Pi for another technique without having to flash it all again and start from scratch.


Thursday, 29 March 2018

Webiopi upgrade from Wheezy to Jessie

DECISION: Forget WebIOPi on Jessie. Let's do the next two things:
1. Cayenne.
2. AD-Hoc Networking

----------- ------------ ---------


Webiopi was working on a card with Raspbian Wheezy, then I updated  and upgraded and I noticed that some files were labelled from Jessie.

After rebooting I couldn't get Webiopi to load. I could ssh into teh R-pi as normal, so I started the WebioPi service but I stiull could not load the web page. What follows is the log for WebIOPi. I'll look at it later to see if I can understand what to do.

2018-01-14 14:17:27 - WebIOPi - INFO - Starting WebIOPi/0.7.1/Python3.4
2018-01-14 14:17:27 - WebIOPi - INFO - GPIO - Native mapped to REST API /GPIO
2018-01-14 14:17:27 - WebIOPi - INFO - Loading configuration from /etc/webiopi/config
2018-01-14 14:17:28 - WebIOPi - INFO - Loading myproject from /home/pi/rc-car/python/script.py
2018-01-14 14:17:28 - WebIOPi - INFO - Access protected using /etc/webiopi/passwd
2018-01-14 14:17:28 - WebIOPi - INFO - HTTP Server binded on http://192.168.1.8:8000/
2018-01-14 14:17:28 - WebIOPi - INFO - CoAP Server binded on coap://192.168.1.8:5683/
2018-01-14 14:17:28 - WebIOPi - INFO - CoAP Server binded on coap://224.0.1.123:5683/ (MULTICAST)
2018-01-14 14:17:37 - WebIOPi - INFO - Starting WebIOPi/0.7.1/Python3.4
2018-01-14 14:17:37 - WebIOPi - INFO - GPIO - Native mapped to REST API /GPIO
2018-01-14 14:17:37 - WebIOPi - INFO - Loading configuration from /etc/webiopi/config
2018-01-14 14:17:37 - WebIOPi - INFO - Loading myproject from /home/pi/rc-car/python/script.py
2018-01-14 14:17:37 - WebIOPi - INFO - Access protected using /etc/webiopi/passwd
2018-01-14 14:17:37 - WebIOPi - INFO - HTTP Server binded on http://192.168.1.8:8000/
2018-01-14 14:17:37 - WebIOPi - INFO - CoAP Server binded on coap://192.168.1.8:5683/
2018-01-14 14:17:37 - WebIOPi - INFO - CoAP Server binded on coap://224.0.1.123:5683/ (MULTICAST)
2018-01-14 14:17:28 - WebIOPi - INFO - Starting WebIOPi/0.7.1/Python3.4
2018-01-14 14:17:28 - WebIOPi - INFO - GPIO - Native mapped to REST API /GPIO
2018-01-14 14:17:28 - WebIOPi - INFO - Loading configuration from /etc/webiopi/config
2018-01-14 14:17:29 - WebIOPi - INFO - Loading myproject from /home/pi/rc-car/python/script.py
2018-01-14 14:17:29 - WebIOPi - INFO - Access protected using /etc/webiopi/passwd
2018-01-14 14:17:29 - WebIOPi - INFO - HTTP Server binded on http://192.168.1.8:8000/
2018-01-14 14:17:29 - WebIOPi - INFO - CoAP Server binded on coap://192.168.1.8:5683/
2018-01-14 14:17:29 - WebIOPi - INFO - CoAP Server binded on coap://224.0.1.123:5683/ (MULTICAST)
2018-03-29 15:14:21 - WebIOPi - INFO - Stopping...
2018-03-29 15:14:22 - WebIOPi - INFO - CoAP Server stopped
2018-03-29 15:14:22 - WebIOPi - INFO - HTTP Server stopped
2018-03-29 15:14:52 - WebIOPi - INFO - Starting WebIOPi/0.7.1/Python3.4
2018-03-29 15:14:52 - WebIOPi - INFO - GPIO - Native mapped to REST API /GPIO
2018-03-29 15:14:52 - WebIOPi - INFO - Loading configuration from /etc/webiopi/config
2018-03-29 15:14:52 - WebIOPi - ERROR - name 'GPIO' is not defined
Traceback (most recent call last):
  File "/usr/local/lib/python3.4/dist-packages/WebIOPi-0.7.1-py3.4-linux-armv6l.egg/webiopi/__main__.py", line 75, in
    main(sys.argv)
  File "/usr/local/lib/python3.4/dist-packages/WebIOPi-0.7.1-py3.4-linux-armv6l.egg/webiopi/__main__.py", line 69, in main
    server = Server(port=port, configfile=configfile, scriptfile=scriptfile)
  File "/usr/local/lib/python3.4/dist-packages/WebIOPi-0.7.1-py3.4-linux-armv6l.egg/webiopi/server/__init__.py", line 52, in __init__
    self.gpio.addSetups(config.items("GPIO"))
  File "/usr/local/lib/python3.4/dist-packages/WebIOPi-0.7.1-py3.4-linux-armv6l.egg/webiopi/devices/digital/gpio.py", line 62, in addSetups
    self.addGPIOSetup(gpio, params)
  File "/usr/local/lib/python3.4/dist-packages/WebIOPi-0.7.1-py3.4-linux-armv6l.egg/webiopi/devices/digital/gpio.py", line 55, in addGPIOSetup
    self.addGPIO(self.gpio_setup, gpio, params)
  File "/usr/local/lib/python3.4/dist-packages/WebIOPi-0.7.1-py3.4-linux-armv6l.egg/webiopi/devices/digital/gpio.py", line 45, in addGPIO
    func = GPIO.OUT
NameError: name 'GPIO' is not defined


There's one thing -->  GPIO is not defined.

things to try:
https://raspberrypi.stackexchange.com/questions/37327/global-name-gpio-is-not-defined-errors-on-webiopi

At the bottom of this is the suggestion that I start WebIOPi specifically via Python3. This gives the webIOpi menu and GPIO pin display, but doesnt operate them.  It didn't start my web page.


Commands:
 sudo /etc/init.d/webiopi stop
sudo python3 -m webiopi 8000
gives when stopped: 
pi@raspberrypi:/var/log $ sudo python3 -m webiopi 8000

2018-03-30 10:41:36 - WebIOPi - INFO - Starting WebIOPi/0.7.1/Python3.4

2018-03-30 10:41:36 - WebIOPi - INFO - GPIO - Native mapped to REST API /GPIO

2018-03-30 10:41:36 - WebIOPi - WARNING - Access unprotected

2018-03-30 10:41:36 - WebIOPi - INFO - HTTP Server binded on http://192.168.1.8:8000/

2018-03-30 10:41:36 - WebIOPi - INFO - CoAP Server binded on coap://192.168.1.8:5683/

2018-03-30 10:41:36 - WebIOPi - INFO - CoAP Server binded on coap://224.0.1.123:5683/ (MULTICAST)

----------------------------------------

Exception happened during processing of request from ('::ffff:192.168.1.11', 46518, 0, 0)

Traceback (most recent call last):

  File "/usr/local/lib/python3.4/dist-packages/WebIOPi-0.7.1-py3.4-linux-armv6l.egg/webiopi/protocols/http
.py", line 238, in processRequest

    result = self.server.handler.do_GET(relativePath, compact)

  File "/usr/local/lib/python3.4/dist-packages/WebIOPi-0.7.1-py3.4-linux-armv6l.egg/webiopi/protocols/rest
.py", line 147, in do_GET

    return (200, self.getJSON(compact), M_JSON)

  File "/usr/local/lib/python3.4/dist-packages/WebIOPi-0.7.1-py3.4-linux-armv6l.egg/webiopi/protocols/rest
.py", line 245, in getJSON

    gpios[gpio][f] = GPIO.getFunctionString(gpio)

NameError: name 'GPIO' is not defined
And lots more repeats of this. 
???? 
Possibly this, but doesn't mention Jessie
http://webiopi.trouch.com/issues/140/

This first I think:
https://groups.google.com/forum/#!topic/webiopi/BGc-mcD3UEw
-- It won't work. My version number is the one already in the file.


Wednesday, 28 March 2018

Second RC Car

MArch 2018,
I have another RC car that I have modified to be driven by a Raspberry Pi. I am using the same RAspberry Pi and software as I did on the first.

Here is a picture of the rig.

The Hot glue gun is my new favourite tool. I used tabs of glue to hold this battery pack in, and glued the plastic battery holder (white plastic) to the body for the power pack

The electronics are simpler than on the previous car, as there are no feedback wires from the steering gear.  


The IC is labelled RX2C which I take to mean receiver-2-channel and from the schematic I found which pins were the outputs to the motors, as labelled.


Here is the layout on the car. I brought the wires from underneath out to a strip of pins, and labelled them so that I can easily swap them out to try another controller if I get one. The leads from the Raspberry Pi are visible also coming from the GPIO pins to what had been the IC legs, replaced with pins.  To have been tidier I should have bought some leads, but I just quickly cobbled these together. 

It took a bit of testing to get these pins on the pin-strip correct, and the car turning left/right or backwards/forwards as desired. If I did it again I would put the Positive  and Ground leads at either end of the strip to separate them. 

Next thing to do is add a Youtube video of it in operation, then swap the controller board out for this Deek-Robot H Bridge controller that I have bought. 


Wednesday, 7 March 2018

Challenge for DT in Secondary Schools.

How about 'Dorset Robo-Challenge  Modelled on Robot wars, with competitions within the school throughout the year and an Interschool competition at the end of the year. 

To make it interesting all robots to be controlled by Raspberry Pi, Micro:bot, or Arduino.

Obviously it needs some 'House' robots and pitfalls. I think a sideswiping axe from the middle of one side of the competition chamber and a box that has sides that flip up to enclose the 'bot when it gets on the centre.

Get local companies to provide a technical champion for each team?


Friday, 19 January 2018

Big Christmas for repairs

Yes,  the thing that stands out most  about this Christmas is the number of repairs I have had to do in the last month.

1. Early December I was backing up  Raspberry Pi images to my computer and it stopped - disk full. I made a bit of space and backed it up to my backup 500Gb disk. When I was disconnecting it I dropped it, and it wouldn't work any more. it just made a ticking sound. So Bought a new 1TB disk  and took the seagate backup unit apart and replaced the disk, then did another full backup. I took apart the broken disk and moved the head to the innner resting place, and then tested it. It now works again.

2. The glass in the Father-son lamp broke and I found it all over the sofa in the morning. I got a new piece from Tappers (free), but it alos broke. the problem was that the little light bulb was too close to the glass and the filament in it was against the glass, so I bought  some more bulbs and replaced that one.

3. Then the garage door  spring broke on Christmas Eve. I ordered a new hook and fixed it. I wrote an Instructable on that.


4. The Microwave combination oven broke down in the middle of cooking a meal. The next morning I went out and bought a new one.


5. One of the curly light bulbs in the trilight in the dining room went out. I needed to source  a new one. (Wilko)

6. A car headlight bulb was gone. I managed to get it out, but I couldn't get the clip in around the new one. I ended up having to take the bumper off to get the headlight out  so that I could see what I was doing.

7. Sophie picked up my play RC car and it hasn't worked since. That's an ongoing project.

8. 18 January 2018 The breadmaker is making awful grinding noises in the vicinity of the drive belt. Phoned Morphy richards and they are going to send a new one. The warranty ran out on January 27 - 9 days time.

9. 18 January 2018. The car failed to start when we were out for our afternoon tea. I think that we have only been doing short runs with the lights on and it had been run down, but I managed to get it changed under warranty at Halfords today- about 3 months short of the end of the four year warranty.

When I remember the rest I'll add them

Now it's early February and the sole has come off my shoe. The shoe isn't that old so I'll take them back to Clarks and see what they can do.